# Installation


# NORA inside a Docker

#### <span style="font-weight: 400;">​Install Docker on your host system</span>

<span style="font-weight: 400;">First, install docker, git and jq on your host system</span>

`<span style="font-weight: 400;">sudo apt-get install docker.io git jq</span>`

<span style="font-weight: 400;">There might be an issue with the DNS address in docker. To check this, run</span>

`<span style="font-weight: 400;">docker run busybox nslookup google.com</span>`

<span style="font-weight: 400;">If the host cannot be reached, grep the address of your DNS server</span>

`<span style="font-weight: 400;">nmcli dev show | grep 'IP4.DNS'</span>`

<span style="font-weight: 400;">create the file </span><span style="font-weight: 400;">/etc/docker/daemon.json</span><span style="font-weight: 400;"> and insert the address as</span>

`<span style="font-weight: 400;">{</span>`

```<span style="font-weight: 400;">    "dns": ["yourDNSip", "8.8.8.8"]</span>`

`<span style="font-weight: 400;">}</span>`

<span style="font-weight: 400;">then restart docker</span>

`<span style="font-weight: 400;">sudo service docker restart</span>`

<span style="font-weight: 400;">go back to the busybox above and check if it works now.</span>

<span style="font-weight: 400;">Now, you should add your user to the docker group, otherwise you have not to </span>*<span style="font-weight: 400;">sudo</span>*<span style="font-weight: 400;"> all NORA commands </span>

`<span style="font-weight: 400;">sudo adduser <username> docker</span>`

<p class="callout warning">**!!! you have to re-login to make these changes apply !!!!!!**</p>

##  

#### <span style="font-weight: 400;">Clone the git repository</span>

**NORA was historically named DPX. Note that this name might still often be used in the following.**<span style="font-weight: 400;"> Clone the repository into to a temp folder, or to your favorite program place.  
</span><span style="font-weight: 400;">Let's say we clone to your home directory into </span><span style="font-weight: 400;">~/nora</span>

`<span style="font-weight: 400;">git clone  https://<yourname>@bitbucket.org/reisert/dpx.git ~/nora</span>`

<span style="font-weight: 400;">If want to use NORA in a multi-user environment you might want to create a specific group (we usually use </span>*<span style="font-weight: 400;">dpxuser</span>*<span style="font-weight: 400;">) and change the group of that directory (recursivey) accordingly. </span><span style="font-weight: 400;">In any case, you have to set the s -flag and some ACLs recursively to that dir </span>*<span style="font-weight: 400;">(you might have to run this as sudo. In this case make sure to apply it to the correct ~/nora directory !! )</span>*

`<span style="font-weight: 400;">find ~/nora  -type d -exec  chmod g+s {} +</span>`

<span style="font-weight: 400;">If want to manage rights by ar group user</span>

`<span style="font-weight: 400;">chgrp -R NORA ~/nora # if you manage your right via usergroup NORA./dp</span>`

<span style="font-weight: 400;">nonetheless</span>

`<span style="font-weight: 400;">setfacl -R -d -m g::rwx ~/nora</span>`

#### <span style="font-weight: 400;">Initial configuration</span>

<span style="font-weight: 400;">Go into the nora directory and run </span><span style="font-weight: 400;">./install</span>

<span style="font-weight: 400;">This will create some local config files in the "conf" directory (for details see separate section below).</span>

<span style="font-weight: 400;"> NORA has 3 modules </span>

- **Frontend:** *<span style="font-weight: 400;">webserver with image viewer </span>*
- **DICOM node**<span style="font-weight: 400;"> to receive images from a PACS </span>
- **Backend:**<span style="font-weight: 400;"> processing module (depending on your preferences matlab or nodejs and slurm or SGE based)</span>

<span style="font-weight: 400;">By default, all three modules are enabled. To run NORA in this default configuration edit </span><span style="font-weight: 400;">main.conf</span><span style="font-weight: 400;"> and set at least </span><span style="font-weight: 400;">MATLABPATH: &lt;your-path-to-matlab&gt;</span>

<span style="font-weight: 400;">If you are behind a proxy, it might also be necessary to set the proxy (maybe even with user/password)</span>

`<span style="font-weight: 400;">DOCKER_http_proxy:" ... "</span>`

<span style="font-weight: 400;">Also set the user Nora should act as in the main.conf</span>

`<span style="font-weight: 400;">DPXUSER: " ... "</span><span style="font-weight: 400;"><br></br></span><span style="font-weight: 400;">DPXGROUP: " ... "</span>`

#### <span style="font-weight: 400;">Build the docker image</span>

<span style="font-weight: 400;">Your main function to control NORA is </span><span style="font-weight: 400;">dpxcontrol</span><span style="font-weight: 400;">. You can always run</span>

`<span style="font-weight: 400;">./dpxcontrol</span>`

<span style="font-weight: 400;">to get more help. To build the DOCKER image, first run</span>

`<span style="font-weight: 400;">./dpxcontrol docker build</span>`

<span style="font-weight: 400;">This will take a while. If everything went well, start all modules with</span>

`<span style="font-weight: 400;">./dpxcontrol start</span>`

<span style="font-weight: 400;">If something went wrong during installation / starts, there might be old 'zombie' containers. In this case you will be suggested docker commands to remove them. You can also start with </span><span style="font-weight: 400;">--force</span><span style="font-weight: 400;">to autoremove old NORA containers.</span>

<span style="font-weight: 400;">To check the status, now use</span>

`<span style="font-weight: 400;">./dpxcontrol status</span>`

<span style="font-weight: 400;">If at least the first point, Docker, is running nicely, you should be able to log into the Webinterface. (see below)</span>

#### <span style="font-weight: 400;">Log into the Webinterface</span>

<span style="font-weight: 400;">Now, open a web-browser and go to </span><span style="font-weight: 400;">localhost:81</span><span style="font-weight: 400;">. Default login is</span><span style="font-weight: 400;">  
  
</span><span style="font-weight: 400;">user</span>**:**<span style="font-weight: 400;"> root  
</span><span style="font-weight: 400;">password</span>**:**<span style="font-weight: 400;"> dpxuser</span>

<span style="font-weight: 400;">There are several options to create new users. You can either connect to an existing LDAP server, or just create users based on the internal user management of NORA (see Administration section for details). </span>

#### <span style="font-weight: 400;">Troubleshooting and testing</span>

<span style="font-weight: 400;">Most log files are written into</span>

`<span style="font-weight: 400;"><path-to-nora>/var/syslogs/</span>`

<span style="font-weight: 400;">These can also be seen from the </span>*<span style="font-weight: 400;">admin</span>*<span style="font-weight: 400;"> dialog at the top of the webinterface. </span>**If the daemon is not starting (or stopping again, red status) check the daemon.log for more info.**<span style="font-weight: 400;"> In case of a license error, maybe you have to forward your MAC adress to Docker (see </span><span style="font-weight: 400;">main.conf</span><span style="font-weight: 400;"> for more info)</span>

<span style="font-weight: 400;">For other system parts, there are also some test functions</span>

`<span style="font-weight: 400;">./dpxcontrol test [slurm | email | more_to_be_programmed]</span>`

#### <span style="font-weight: 400;">Upgrade the database</span>

<span style="font-weight: 400;">When your daemon is running nicely, it might be necessary to upgrade the initial database with</span>

`<span style="font-weight: 400;">./dpxcontrol matlab updatedb</span>`

#### <span style="font-weight: 400;">Autostart on system startup</span>

<span style="font-weight: 400;">To automatically start NORA when your computer starts, you can for example add </span><span style="font-weight: 400;">&lt;path-to-nora&gt;/dpxcontrol start --force</span> <span style="font-weight: 400;">to your </span><span style="font-weight: 400;">/etc/rc.local</span>

#### <span style="font-weight: 400;">Slurm setup</span>

<span style="font-weight: 400;">A proper configuration of slurm is a science on its own. Ask google for more information. If you are running slurm inside docker (default), the </span><span style="font-weight: 400;">conf/slurm.conf</span><span style="font-weight: 400;"> is used and you do not have to do too much. Otherwise, if docker is installed outside (this should be the correct practice) you have to it install via </span>

`<span style="font-weight: 400;">sudo apt-get install slurm-wlm</span>`

<span style="font-weight: 400;">on a deb-system and set </span>

`<span style="font-weight: 400;">DOCKER_run_daemon_in_docker: 0,</span>`

<span style="font-weight: 400;">in the </span><span style="font-weight: 400;">&lt;path-to-nora&gt;/conf/main.conf</span><span style="font-weight: 400;"> file. For configuring slurm itself there is a configurator interface via html, which you usually find here </span>

`<span style="font-weight: 400;">/usr/share/doc/slurmctld/slurm-wlm-configurator.easy.html</span>`

<span style="font-weight: 400;">which generates a conf file </span><span style="font-weight: 400;">/etc/slurm-llnl/slurm.conf</span><span style="font-weight: 400;"> where you have replace the hostname by the machine you are running NORA on. Further, the partitions have to specified. NORA has as default two partitions</span><span style="font-weight: 400;">  
</span><span style="font-weight: 400;">(computing queues) DPXproc and DPXimport, which have to specified in the slurm.conf like in this example:</span>

`<span style="font-weight: 400;"># COMPUTE NODES</span><span style="font-weight: 400;"><br></br></span><span style="font-weight: 400;">NodeName=hostname CPUs=8 State=UNKNOWN</span><span style="font-weight: 400;"><br></br></span><span style="font-weight: 400;">PartitionName=DPXproc Nodes=hostname Default=YES MaxTime=INFINITE State=UP</span><span style="font-weight: 400;"><br></br></span><span style="font-weight: 400;">PartitionName=DPXimport Nodes=hostname Default=YES MaxTime=INFINITE State=UP</span>`

<span style="font-weight: 400;">Alternatively, if you have an existing SLURM running with predefined paritions, you can change the paritions (queues) in NORA’s configuration in </span><span style="font-weight: 400;">&lt;path-to-nora&gt;/conf/main.conf (SLURM\_QUEUES)</span>

<span style="font-weight: 400;">Also consider </span>

`<span style="font-weight: 400;">./dpxcontrol test slurm </span>`

<span style="font-weight: 400;">for testing whether your slurm configuration is working.</span>

#### <span style="font-weight: 400;">General Configuration</span>

<span style="font-weight: 400;">All configuration files are located in </span><span style="font-weight: 400;">&lt;path-to-nora&gt;/conf</span><span style="font-weight: 400;"> directory. The configuration files are</span>

- <span style="font-weight: 400;">main.conf </span><span style="font-weight: 400;">- includes all major configurations, responsible for </span>
- <span style="font-weight: 400;">Location of external programs (MATLAB etc)</span>
- <span style="font-weight: 400;">DOCKER port forwarding</span>
- <span style="font-weight: 400;">Daemon beahviour</span>
- <span style="font-weight: 400;">Import behavior (dicoms etc)</span>
- <span style="font-weight: 400;">Mysql information</span>
- <span style="font-weight: 400;">signin/signup behaviour, LDAP configuration</span>
- <span style="font-weight: 400;">Backup behavior</span>

- <span style="font-weight: 400;">pacs.conf -</span><span style="font-weight: 400;"> includes all information how to connect to external dicom nodes</span>
- <span style="font-weight: 400;">routes.conf </span><span style="font-weight: 400;">- ip-addresses of DB, and routes of mount dirs (depending on hostnames diffferent mount locations are possible</span>
- <span style="font-weight: 400;">slurm.conf </span><span style="font-weight: 400;">- slurm configuration</span>
- <span style="font-weight: 400;">smail.conf </span><span style="font-weight: 400;">- mail configuration</span>

# Administration Backend

[![image-1600352934446.png](https://www.nora-imaging.org/doc/uploads/images/gallery/2020-09/scaled-1680-/image-1600352934446.png)
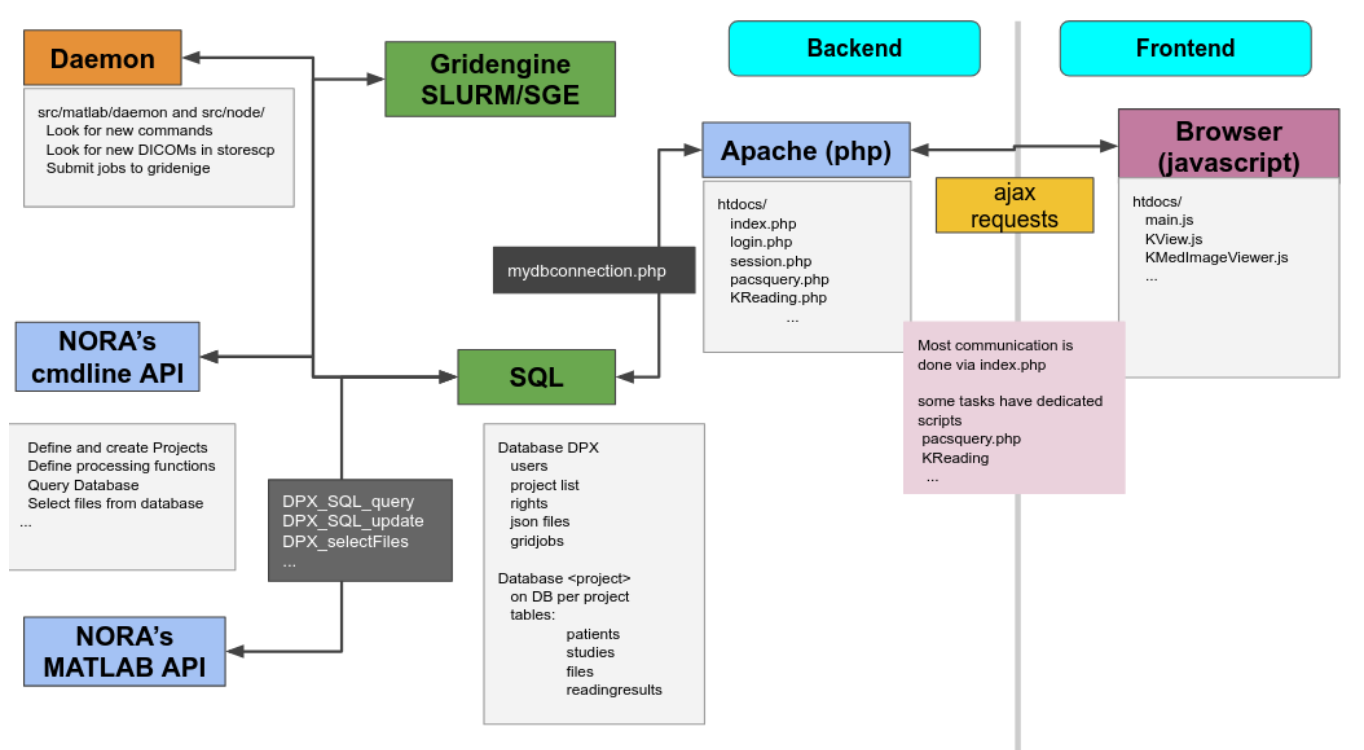
](https://www.nora-imaging.org/doc/uploads/images/gallery/2020-09/image-1600352934446.png)

#### Command line Interface (BASH)

<span style="font-weight: 400;">You need a PATH to </span>`<span style="font-weight: 400;"><path-to-nora>/src/node</span>`

<span style="font-weight: 400;">Call</span>

`<span style="font-weight: 400;">nora</span>`

<span style="font-weight: 400;">any get help</span>

```
                                                                                                                                                                                            
 NORA - backend                                                                                                                                                                              
usage: nora [--parameter] [value]                                                                                                                                                            
--project (-p) [name]                                                                                                                                                                        
       all preceding commands refer to this project                                                                                                                                          
                                                                                                                                                                                             
MANAGEMENT                                                                                                                                                                                   
--sql (-q) [sqlstatement]  [--csv]                                                                                                                                                           
       executes SQL statment and return result as json (or as csv if option is given)                                                                                                        
--add (-a) [file] ...                                                                                                                                                                        
       adds list of files to project                                                                                                                                                         
       option: --addtag tag1,tag2,... (tags the files)                                                                                                                                       
--del (-d) [file] ...                                                                                                                                                                        
       deletes list files                                                                                                                                                                    
--del_pat (-dp) [patient_id] [patients_id#studies_id] ...                                                                                                                                    
       deletes list of patients/studies                                                                                                                                                      
--out (-o) [filepattern]                                                                                                                                                                     
            computes absolute outputfilepath from filepattern (see description of filepattern below)                                                                                         
--pathout (-pa) [filepattern]                                                                                                                                                                
            computes absolute outfilepath from filepattern                                                                                                                                   
--select (-s) [--json (-j)] [--byfilename] [filepattern]                                                                                                                                     
            returns files matching filepattern, if --json is given, files are return as json filepattern                                                                                     
            if --byfilename (together with --json) is given, files are restructered by filename                                                                                              
--addtag tag1,tag2,... -s [filepattern]                                                                                                                                                      
            add tag to file                                                                                                                                                                  
--rmtag tag1,tag2,... -s [filepattern]                                                                                                                                                       
            removes tags fromfile                                                                                                                                                            
--launch (-l) [json]                                                                                                                                                                         
            launches batch from json description                                                                                                                                             
--createproject (-c) [name] [module]  
            creates a project with [name] from [module] definition
--admin [parameter1] [parameter2] ... 
            calls the admin tools (see nora --admin for more help)

PROCESSING
--launch json      
            launches a NORA job given by json 
            options: --throwerror
                     --handle_job_result (emits DONE signal, when ready) 
--launchfile jsonfile      
            same as --launch but json given by fileref 
--launch_autoexec psid 
       launches the autoexecution pipeline of the project for the patient specified by psid
--import srcpath      
            imports dicoms located in sourcepath to given project 
            options: --autoexec_queue (if given autoexecuter is initiated, use DEFAULT to select default autoexecution queue given in config) 
                     --handle_job_result (emits DONE signal, when ready) 
                     --extrafiles_filter: if there are non-dicom files in your dicomfolder and you 
                    want to add them to your patient folder, then, give here a comma-separated list of 
                    accepted extensions (e.g. nii,hdr,img)
                     --patients_id PIZ (overwrite patients_id of imported data with PIZ ) 
                     --studies_id SID (overwrite studies_id of imported data with SID ) 
                     --pattern REGEX (use REGEX applied on srcpath of dicoms to overwrite 
                                patients_id/studies_id, example: 
                          --pattern "(?<studies_id>[\w\-]+)\/(?<patients_id>\w+)$" 

OTHER
--exportmeta [filepattern]      
            exports meta data as csv. Meta content from files matching [filepattern] are exported
            options: --keys a comma separated list of key-sequences, which are exported [optional]
                   a key sequence is given by a dot-separated list, where the first key refers to the name of 
                   the json-file (as multiple jsons might be contained in the query). A wildcard * is possible 
                   select multiple keys at once 
                     examples: 
                   nora -p XYZ --exportmeta '*' 'nodeinfo.json'       // gathers also patient info
                   nora -p XYZ --exportmeta '*' 'META/radio*.json' --keys '*.mask.volume,*.mask.diameter'


```

#### MATLAB Interface 

<span style="font-weight: 400;">To setup NORA for MATLAB you change to the folder </span>

<span style="font-weight: 400;">`<path-to-nora>/src/matlab`  
  
</span><span style="font-weight: 400;">at the MATLAB prompt and start </span><span style="font-weight: 400;">DPX\_startup. </span><span style="font-weight: 400;">This sets up all necessary paths and the database connection. To test the DB connection, make a call to </span><span style="font-weight: 400;">DPX\_Project</span><span style="font-weight: 400;">. This should list all created projects (initially only the default project). There are a variety of management commands to manage users/project/data etc. Here a list of important ones:</span>

- <span style="font-weight: 400;">General</span>
- <span style="font-weight: 400;">DPX\_startup</span><span style="font-weight: 400;"> - sets up NORA</span>
- <span style="font-weight: 400;">DPX\_Project</span><span style="font-weight: 400;"> - choose a project</span>
- <span style="font-weight: 400;">DPX\_getCurrentProject</span><span style="font-weight: 400;"> - get the current project information</span>
- <span style="font-weight: 400;">DPX\_SQL\_createUser</span><span style="font-weight: 400;"> - create a user</span>
- <span style="font-weight: 400;">DPX\_SQL\_createProject</span><span style="font-weight: 400;"> - create a project</span>

- <span style="font-weight: 400;">File selection </span>
- <span style="font-weight: 400;">DPX\_getOutputLocation </span><span style="font-weight: 400;">- compute the path to certain output</span>
- <span style="font-weight: 400;">DPX\_selectFiles </span><span style="font-weight: 400;">- select files based on pattern</span>
- <span style="font-weight: 400;">DPX\_getFileinfo </span><span style="font-weight: 400;">- get additional file information (no database involved)</span>
- <span style="font-weight: 400;">DPX\_SQL\_getFileInfo</span><span style="font-weight: 400;"> - get information from database for this file</span>

- <span style="font-weight: 400;">Processing</span>
- <span style="font-weight: 400;">DPX\_demon -</span><span style="font-weight: 400;"> start the processing deamon</span>
- <span style="font-weight: 400;">DPX\_debug\_job -</span><span style="font-weight: 400;"> execute a debug job at the MATLAB command prompt</span>


<span style="font-weight: 400;">DPX\_SQL\_clearGridCmds -</span><span style="font-weight: 400;"> clear all jobs from the pipeline</span> <span style="font-weight: 400;"> </span>

#### <span style="font-weight: 400;">The Database</span>

<span style="font-weight: 400;">There is one general database scheme containing information about users, projects, jobs, settings etc.   
</span><span style="font-weight: 400;">You can see below the table schemes. </span>

- **Projects/User management**

- <span style="font-weight: 400;">projects</span>
- <span style="font-weight: 400;">users</span>
- <span style="font-weight: 400;">rights - who can read which project in which role</span>


- **Batch/Jobs**

- <span style="font-weight: 400;">gridjobs - contains submitted and running jobs (mirror of qstat or squeue)</span>
- <span style="font-weight: 400;">Commands - contains jobs submitted from web interface, but not yet submitted to resource management system.</span>


- **Miscellaneous**

- <span style="font-weight: 400;">json - various types of jsons (saved batches, shares, settings, states etc.)</span>
- <span style="font-weight: 400;">notifications</span>
- <span style="font-weight: 400;">error\_js</span>


[![image-1600353314610.png](https://www.nora-imaging.org/doc/uploads/images/gallery/2020-09/scaled-1680-/image-1600353314610.png)
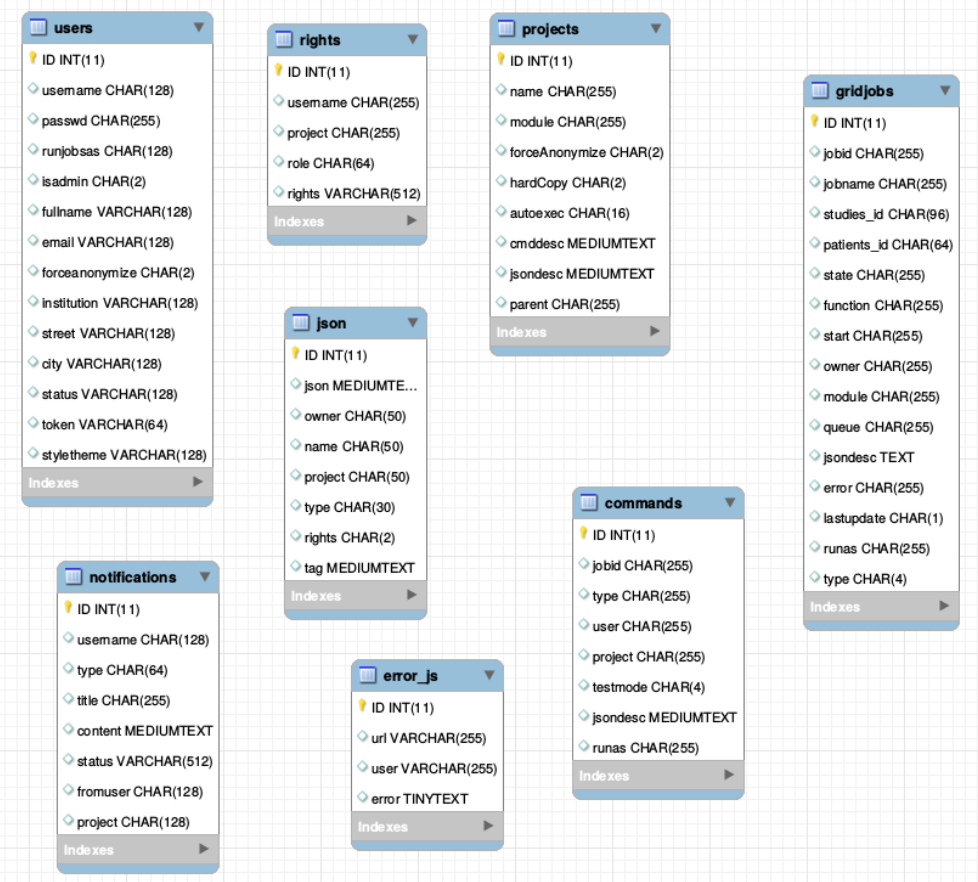
](https://www.nora-imaging.org/doc/uploads/images/gallery/2020-09/image-1600353314610.png)

[![image-1600353338398.png](https://www.nora-imaging.org/doc/uploads/images/gallery/2020-09/scaled-1680-/image-1600353338398.png)](https://www.nora-imaging.org/doc/uploads/images/gallery/2020-09/image-1600353338398.png)

# Segmentation Assistant for ROItool (nnInteractive)

[![image.png](https://nora-imaging.org/doc/uploads/images/gallery/2025-11/scaled-1680-/wlHimage.png)
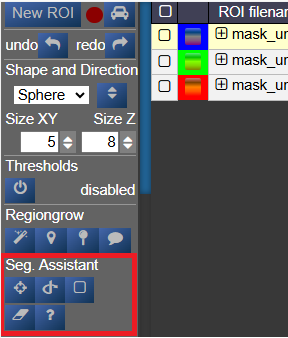
](https://nora-imaging.org/doc/uploads/images/gallery/2025-11/wlHimage.png)

This assistant allows users to create and refine 3D ROIs using interactions. Images, masks, and successive interactions are processed by a deep learning model hosted on a remote server.

The current version of the model is **nnInteractive** (Isensee, Rokuss, Krämer et. al., 2025). [nnInteractive repository](https://github.com/MIC-DKFZ/nnInteractive)

## 1. Usage

First, **select an ROI** from the ROI list to make it the active target for segmentation.

### Point Interaction

- Click the **Point** icon (crosshairs) to activate Point mode
- **Left-click** on the image to add a **positive** point (to include an area)
- **Right-click** on the image to add a **negative** point (to exclude an area)
- The segmentation will be updated immediately. Click the icon again to deactivate
- To add multiple points before updating the segmentation, **hold down the Q key** while adding points. Release the Q key to send all accumulated points at once

### Scribble Interaction

- Click the **Scribble** icon to activate Scribble mode and draw a scribble on the image
- Click the **+** button to run a **positive** interaction (add areas)
- Click the **-** button to run a **negative** interaction (remove areas)
- Scribbles are cleared after each interaction, allowing you to add more

### BBox Interaction

- Click the **BBox** icon (square) to activate Bounding Box mode and draw a box on the image
- Click the **+** button for a **positive** interaction (segment inside the box)
- Click the **-** button for a **negative** interaction (exclude area in the box)
- The box is cleared after each interaction

### Reset Interactions

- When editing the same ROI, all previous interactions are kept in memory server-side to guide the segmentation
- Click the **Reset** icon (eraser) to erase all previous interactions and start fresh

## 2. Server Setup

The segmentation server must be running, typically on a machine with a GPU. First, navigate to the `src/python/segmentation_assistant_server` directory and launch the `setup.sh` script (requires internet access):

<div class="relative group/copy bg-bg-000/50 border-0.5 border-border-400 rounded-lg" id="bkmrk-bash"><div class="sticky opacity-0 group-hover/copy:opacity-100 top-2 py-2 h-12 w-0 float-right"><div class="absolute right-0 h-8 px-2 items-center inline-flex z-10"><div class="relative"><div class="flex items-center justify-center transition-all opacity-100 scale-100"><svg aria-hidden="true" class="shrink-0 transition-all opacity-100 scale-100" fill="currentColor" height="20" viewbox="0 0 20 20" width="20" xmlns="http://www.w3.org/2000/svg"></svg>  
</div><div class="flex items-center justify-center absolute top-0 left-0 transition-all opacity-0 scale-50"><svg aria-hidden="true" class="shrink-0 absolute top-0 left-0 transition-all opacity-0 scale-50" fill="currentColor" height="20" viewbox="0 0 20 20" width="20" xmlns="http://www.w3.org/2000/svg"></svg>  
</div></div></div></div><div class="text-text-500 font-small p-3.5 pb-0">bash</div><div>  
</div></div>```bash
cd src/python/segmentation_assistant_server
./setup.sh
```

This will create a Python virtual environment and install the necessary dependencies.

Next, start the server from a computing node with:

<div class="relative group/copy bg-bg-000/50 border-0.5 border-border-400 rounded-lg" id="bkmrk-bash-1"><div class="sticky opacity-0 group-hover/copy:opacity-100 top-2 py-2 h-12 w-0 float-right"><div class="absolute right-0 h-8 px-2 items-center inline-flex z-10"><div class="relative"><div class="flex items-center justify-center transition-all opacity-100 scale-100"><svg aria-hidden="true" class="shrink-0 transition-all opacity-100 scale-100" fill="currentColor" height="20" viewbox="0 0 20 20" width="20" xmlns="http://www.w3.org/2000/svg"></svg>  
</div><div class="flex items-center justify-center absolute top-0 left-0 transition-all opacity-0 scale-50"><svg aria-hidden="true" class="shrink-0 absolute top-0 left-0 transition-all opacity-0 scale-50" fill="currentColor" height="20" viewbox="0 0 20 20" width="20" xmlns="http://www.w3.org/2000/svg"></svg>  
</div></div></div></div><div class="text-text-500 font-small p-3.5 pb-0">bash</div><div>  
</div></div>```bash
cd src/python/segmentation_assistant_server
./start.sh
```

## 3. Client Configuration

Once the server is running, it will log its port. You must update this client's configuration to point to that address.

Edit the file: `conf/segmentationserver.conf`

Set the `REMOTE_SEGMENTATION_BASE_URL` to the server's address, for example:

<div class="relative group/copy bg-bg-000/50 border-0.5 border-border-400 rounded-lg" id="bkmrk-json"><div class="sticky opacity-0 group-hover/copy:opacity-100 top-2 py-2 h-12 w-0 float-right"><div class="absolute right-0 h-8 px-2 items-center inline-flex z-10"><div class="relative"><div class="flex items-center justify-center transition-all opacity-100 scale-100"><svg aria-hidden="true" class="shrink-0 transition-all opacity-100 scale-100" fill="currentColor" height="20" viewbox="0 0 20 20" width="20" xmlns="http://www.w3.org/2000/svg"></svg>  
</div><div class="flex items-center justify-center absolute top-0 left-0 transition-all opacity-0 scale-50"><svg aria-hidden="true" class="shrink-0 absolute top-0 left-0 transition-all opacity-0 scale-50" fill="currentColor" height="20" viewbox="0 0 20 20" width="20" xmlns="http://www.w3.org/2000/svg"></svg>  
</div></div></div></div><div class="text-text-500 font-small p-3.5 pb-0">json</div><div>  
</div></div>```json
{"REMOTE_SEGMENTATION_BASE_URL":"http://<SERVER_IP>:PORT"}
```

**Important:** You must restart Nora for the changes to take effect.