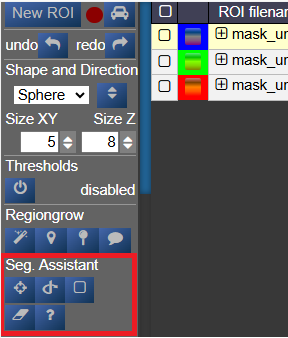
Segmentation Assistant for ROItool (nnInteractive)
This assistant allows users to create and refine 3D ROIs using interactions. Images, masks, and successive interactions are processed by a deep learning model hosted on a remote server.
The current version of the model is nnInteractive (Isensee, Rokuss, Krämer et. al., 2025). nnInteractive repository
1. Usage
First, select an ROI from the ROI list to make it the active target for segmentation.
Point Interaction
- Click the Point icon (crosshairs) to activate Point mode
- Left-click on the image to add a positive point (to include an area)
- Right-click on the image to add a negative point (to exclude an area)
- The segmentation will be updated immediately. Click the icon again to deactivate
- To add multiple points before updating the segmentation, hold down the Q key while adding points. Release the Q key to send all accumulated points at once
Scribble Interaction
- Click the Scribble icon to activate Scribble mode and draw a scribble on the image
- Click the + button to run a positive interaction (add areas)
- Click the - button to run a negative interaction (remove areas)
- Scribbles are cleared after each interaction, allowing you to add more
BBox Interaction
- Click the BBox icon (square) to activate Bounding Box mode and draw a box on the image
- Click the + button for a positive interaction (segment inside the box)
- Click the - button for a negative interaction (exclude area in the box)
- The box is cleared after each interaction
Reset Interactions
- When editing the same ROI, all previous interactions are kept in memory server-side to guide the segmentation
- Click the Reset icon (eraser) to erase all previous interactions and start fresh
2. Server Setup
The segmentation server must be running, typically on a machine with a GPU. First, navigate to the src/python/segmentation_assistant_server directory and launch the setup.sh script (requires internet access):
cd src/python/segmentation_assistant_server
./setup.sh
This will create a Python virtual environment and install the necessary dependencies.
Next, start the server from a computing node with:
cd src/python/segmentation_assistant_server
./start.sh
3. Client Configuration
Once the server is running, it will log its port. You must update this client's configuration to point to that address.
Edit the file: conf/segmentationserver.conf
Set the REMOTE_SEGMENTATION_BASE_URL to the server's address, for example:
{"REMOTE_SEGMENTATION_BASE_URL":"http://<SERVER_IP>:PORT"}Important: You must restart Nora for the changes to take effect.
